Wednesday 31 October 2012

How to install X8 Recovery

                         How to install X8 Recovery


Xrecovery is a tool that can be used to install new Roms, backup/restore your existing ROM,apply patches,batch install applications & many more things.
Its very easy to install and use.

if link broken plz comment it

First download Files:
Xrecovery zip file.
Root Explorer apk file.


Prepear your android phone
Installation:
1.Root your phone if not root your phone Go My Blog How To Root Access in Android
2.Install Root Explorer.
3..Extraxt Xrecovery zip files in your pc then Copy 3 xrecovery files to SD card.
4. open root explorer then
5. Copy 3files from "/sdcard/xrecovery" folder to "/System/bin" if not paste touch mount R/W paste it
6. Reboot.
7. Keep taping the 'back' (the rightmost one) button when 'Sony Ericsson' is displayed.
8. You will enter xrecovery menu.
   
    Using Xrecovery:
1.To move around in xRecovery you use the volume buttons, to select an item you press the Home button (the middle one), and to go back you press the Back button.
2.Use common sense!

Men In Black 3 Dual Audio

                   Men In Black 3 Dual Audio


Men in Black 3

stylized as MIB and alternatively spelled Men in Black III is a 2012 American 3D science fiction comedy film. It was released on May 25, 2012 and stars Will Smith, Tommy Lee Jones and Josh Brolin. Principal photography began in New York City on November 16, 2010, taking place ten years after its predecessor Men in Black II and fifteen years after the release of the original Men in Black Barry Sonnenfeld and Steven Spielberg returned as director and executive producer respectively. It is the third installment in the Men in Black film series based on Lowell Cunningham's The Men in Black comic book series.
Men in Black 3 received generally positive reviews from critics and became a box office success with a worldwide gross of over $624 million. It is also the highest grossing film in the series Buoyed by the film's success, another sequel has been confirmed

 if link broken plz comment it
Download Link :::: Free Download

Ice Age 4 Continental Drift Dual Audio

        Ice Age 4 Continental Drift Dual Audio


Ice Age: Continental Drift

internationally Ice Age 4: Continental Drift or simply as Ice Age 4 is a 2012 American 3-D computer-animated adventure/comedy film directed by Steve Martino and Mike Thurmeier. It was written by Jason Fuchs and Michael Berg, and features the voices of Ray Romano, John Leguizamo, Denis Leary, Nicki Minaj, Drake, Jennifer Lopez, Keke Palmer and Queen Latifah.
It is the fourth installment of the Ice Age series, produced by Blue Sky Studios and distributed by 20th Century Fox. It is the first sequel in the series not directed by Carlos Saldanha,and the second Ice Age installment that utilises Digital 3D. It was released in the US on July 13, 2012, three to six years after its predecessors The Meltdown and Dawn of the Dinosaurs, and ten years after the release of the original Ice Age. This was the first Ice Age film to be shot in the 2.39:1 aspect ratio.
Despite receiving mixed reviews from critics, the film became a box office hit, with a worldwide gross of $867 million

Download Link :::: Free Download

Ghost Rider: Spirit of Vengeance Dual Audio

 Ghost Rider: Spirit of Vengeance Dual Audio


As Johnny Blaze hides out in Eastern Europe, he is called upon to stop the devil, who is trying to take human form.

Directors:

Mark Neveldine, Brian Taylor

Writers:

Scott M. Gimple (screenplay), Seth Hoffman (screenplay)

Stars:

Nicolas Cage, CiarĂ¡n Hinds and Idris Elba | See full cast and crew

Download Link :::: Free Download

Sunday 28 October 2012

Pda Net Fully Cracked

                    Pda Net Fully Cracked

Tether your Android device but confused with many tools, then let’s check out a tool which is called as PDA Net which is basically a free application. For those who don’t know what tethering is, tethering basically turns your smart phone into a modem which can be then connected to a Laptop or to a computer so that you need not search for any other means of internet like 3G or even WiFi. Tethering can be done in many ways but it is recommended to tether via USB cable than wireless option. Though, PDANet software is free, but fully cracked link

Prepare Your Android Phone
Usb Debugging on
So, let’s check out how you can tether your Android device with Windows or Mac computer:
Before we proceed to the step by step procedure on tethering PdaNet you need to first download this tethering app from the Android Marketplace and also install the software on the Windows or Mac computer.
Install PDA Net

  • Download the PdaNet software tool and place the downloaded file in SD card and run the installation package from your phone.
PDA Net Android app

  • Now, you need to configure the PDANet software tool on your desktop. During the installation you will be prompted to select your phone manufacturer so connect your device via USB but before that ensure that you have enabled USB debugging mode on your Android phone which can be done by going into Settings > Applications > Development where you can enable USB Debugging. You may see some warning but you can accept that.
USB Debugging

  • After installing the PDANet software for your Windows or Mac and on Android smart phone you need to search for PDANet in Android market place and need to install the application.
  • Now, its time to connect your Android device to your computer. As soon as you have installed the applications on both the device as well as on computer it’s time to tether now. So first connect your device via USB, go to PDANet app on your smart phone and select Enable USB tether and then use the USB cable to connect your device the laptop. As soon as you connect your device to the laptop or to the desktop you will get a notification on which you need to click on Connect option to proceed for tethering your device.

     Fully Cracked Pda NET

     open pnkg.exe File 

      then generate serial number 
      open pdanet register use your email id and use serial number generate with pnkg.exe
      enjoy fully cracked pda net

if link broken plz comment it
Download Link :::: Fully Cracked Pda NET

How to use Sd card as Internal Memory

      How to use Sd card as Internal Memory


Guide to using

This guide may seem lengthy, but trust us when we say it is straightforward. All steps have been documented which makes it look daunting. Read each section carefully and follow the steps outlined to install Link2SD.

1. PREPARATION
Please make sure you have completed all of the following before starting the tutorial.
On your PC:
– Install the necessary drivers for your Xperia smartphone onto your PC/laptop. The easiest way to do this is to ensure that Sony Ericsson PC Companion is installed on your PC. Once installed, connect your phone to complete the process.
– Download and install MiniTool Partition Wizard onto your PC or laptop.
On your Xperia:
– Enable USB de-bugging mode: Setting –> Applications –> Development –> Tick ‘USB debugging’
– Enable the ability to install unknown apps: Setting –> Applications –> Tick ‘Unknown sources’
– Install Link2SD from link onto your Xperia smartphone. It is a free download.
2. ROOT
Rooting your handset gives you the permissions necessary to install custom software on your handset.


Root Acces Go My Blog  How to Root Access in Android 2.1

3. BACKUP MEMORY CARD
As we will be creating a partition on your microSD memory card, make sure you create a backup just in case anything goes wrong.
a) Create a new folder on your PC and name it anything you want, such as ‘SD_Backup’
b) Connect your phone to the PC, navigate to your memory card and copy the contents to the backup folder.

4. CREATE SECONDARY PARTITION
You now need to create a secondary partition on your microSD memory card that will enable you to use Link2SD.
Note: We will use MiniTool Partition Wizard to create a secondary partition on your microSD card. This partition can be ext2, ext3, ext4 or FAT32. We will use FAT32 as it is supported on all phones and should lead to less troubleshooting later. You can use any partition manager of your choosing, but the steps below guide you through MiniTool Partition Wizard.
There is no need to wipe your memory card when going through this process, just ensure you have at least 0.5GB to 1.0GB of free space to make it worthwhile. You also do not need to use a microSD card adaptor as the process below creates the partition whilst the phone is connected to your PC.
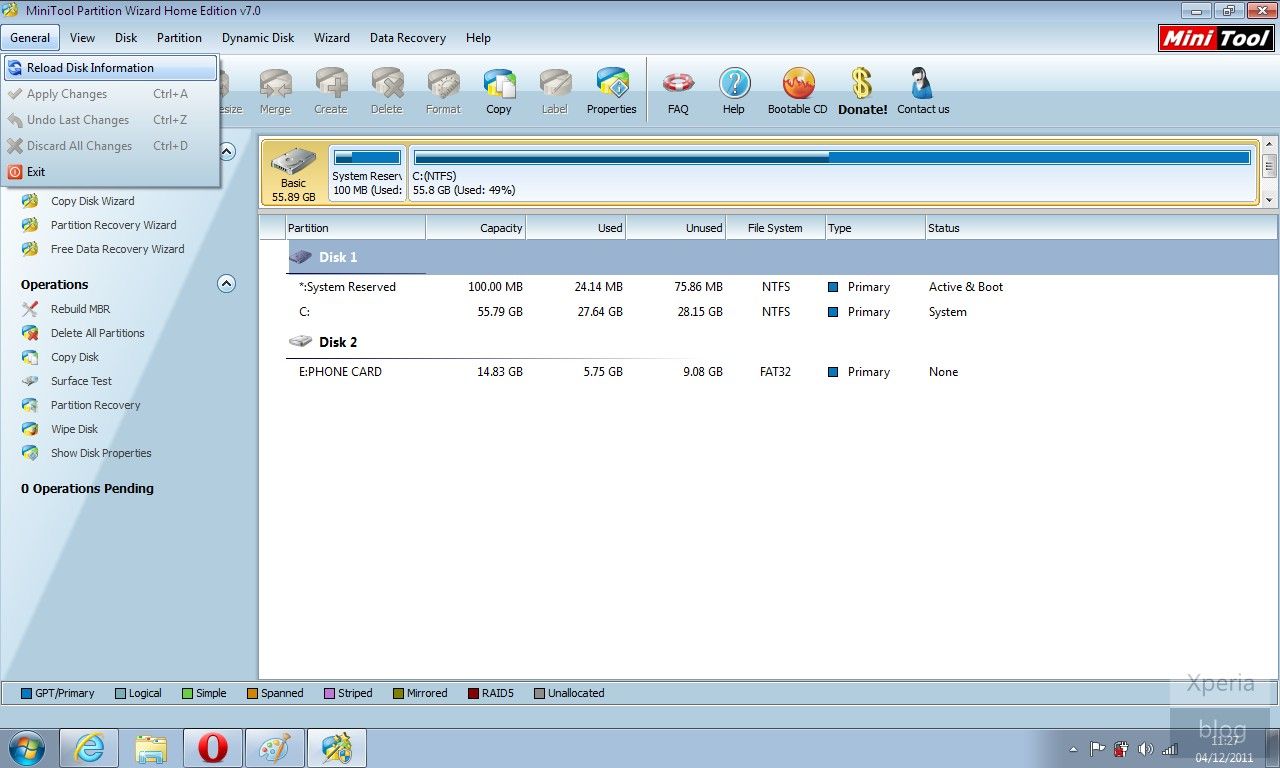
a) Connect your handset to the PC via USB and then launch MiniTool. You should see the details pop up under ‘Disk 2′.
MiniTool Xperia
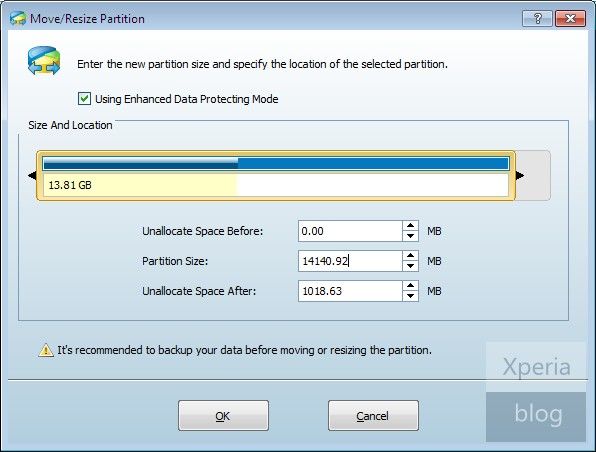
b) Click on the memory card under Disk 2 in MiniTool and then in the left pane, press ‘Move/Resize Partition’. On the blue bar under ‘Size and Location’, move the right arrow towards the left to create the size of the secondary partition desired. In the example below we created a secondary partition with 1018.63MB of space. This value can also be typed in manually in ‘Unallocate Space After’.
MiniTool Xperia
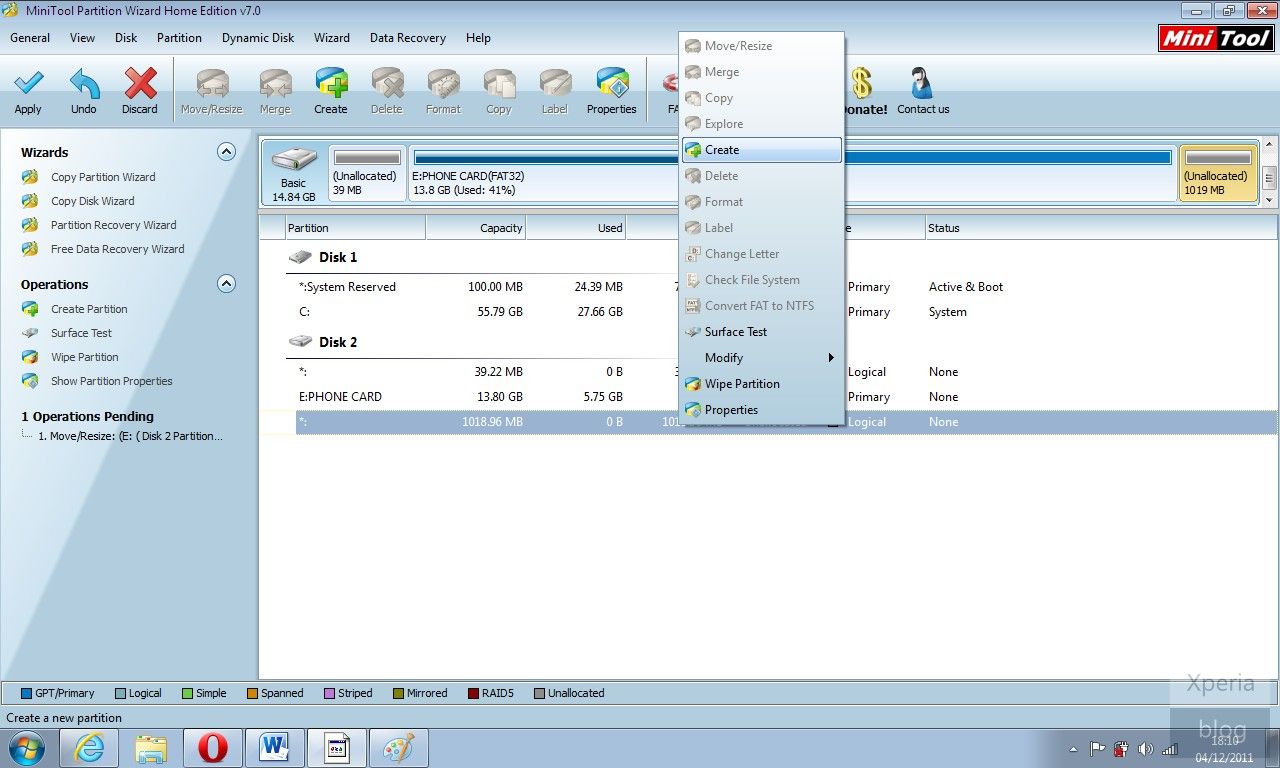
c) Once this is done you should see that your memory card is now split into two partitions under Disk 2 of MiniTool. Right click this new partition and then press ‘Create’.
MiniTool Xperia
If you see this pop-up below, just press ‘Yes’ to continue.
MiniTool Xperia
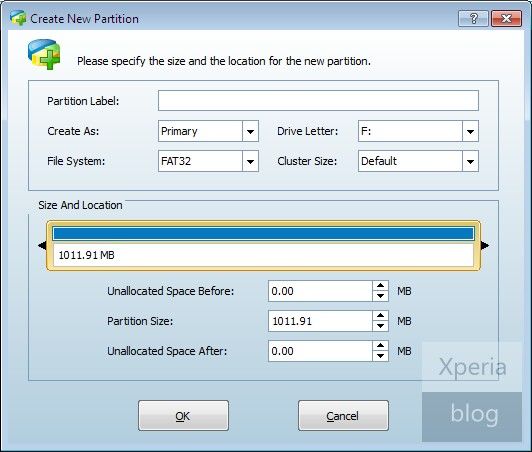
d) You should then see this ‘Create New Partition’ window. Under ‘Create As’ click Primary and then under ‘File System’ click FAT32. Leave the cluster size as default and you can assign whichever drive letter you want. Once finished press OK.
MiniTool Xperia
e) This should bring you back to the main MiniTool screen. Now hit the ‘Apply’ button on the top-left of the screen, denoted by a tick symbol.
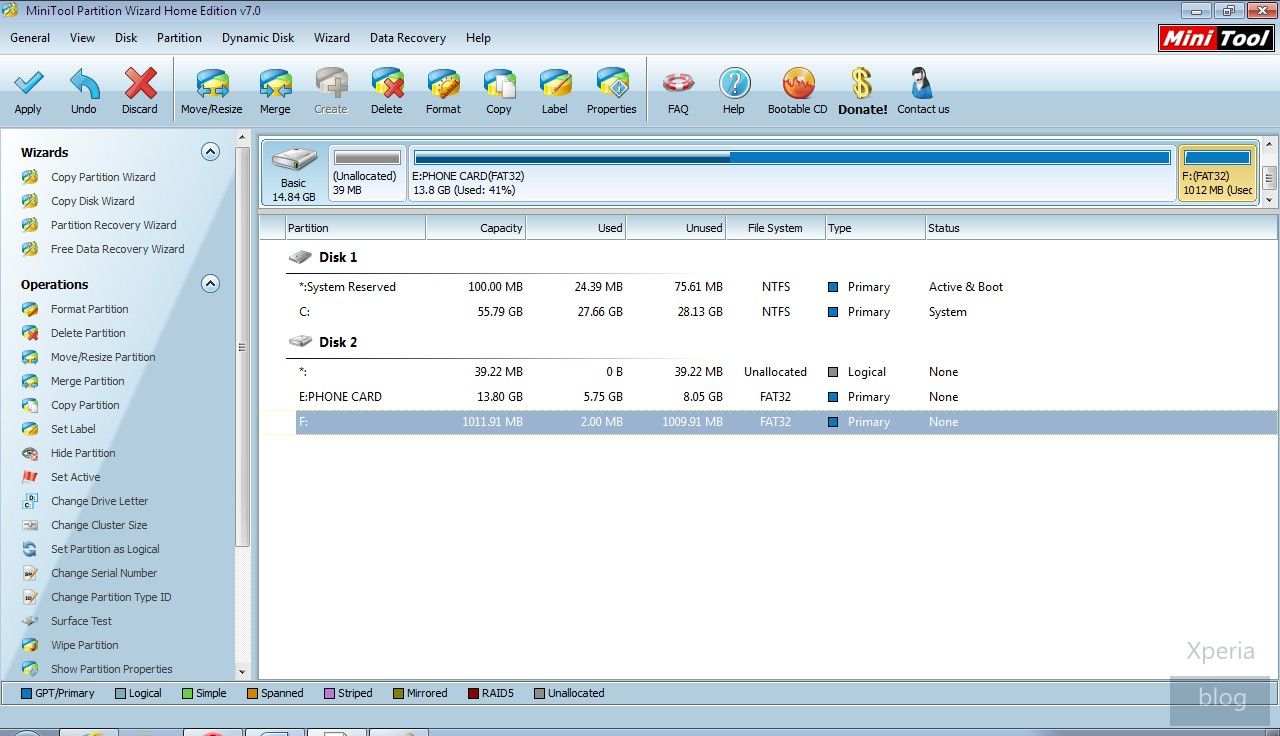
MiniTool Xperia
This will bring up another pop-up window and will take several minutes to both resize and create the secondary partition.
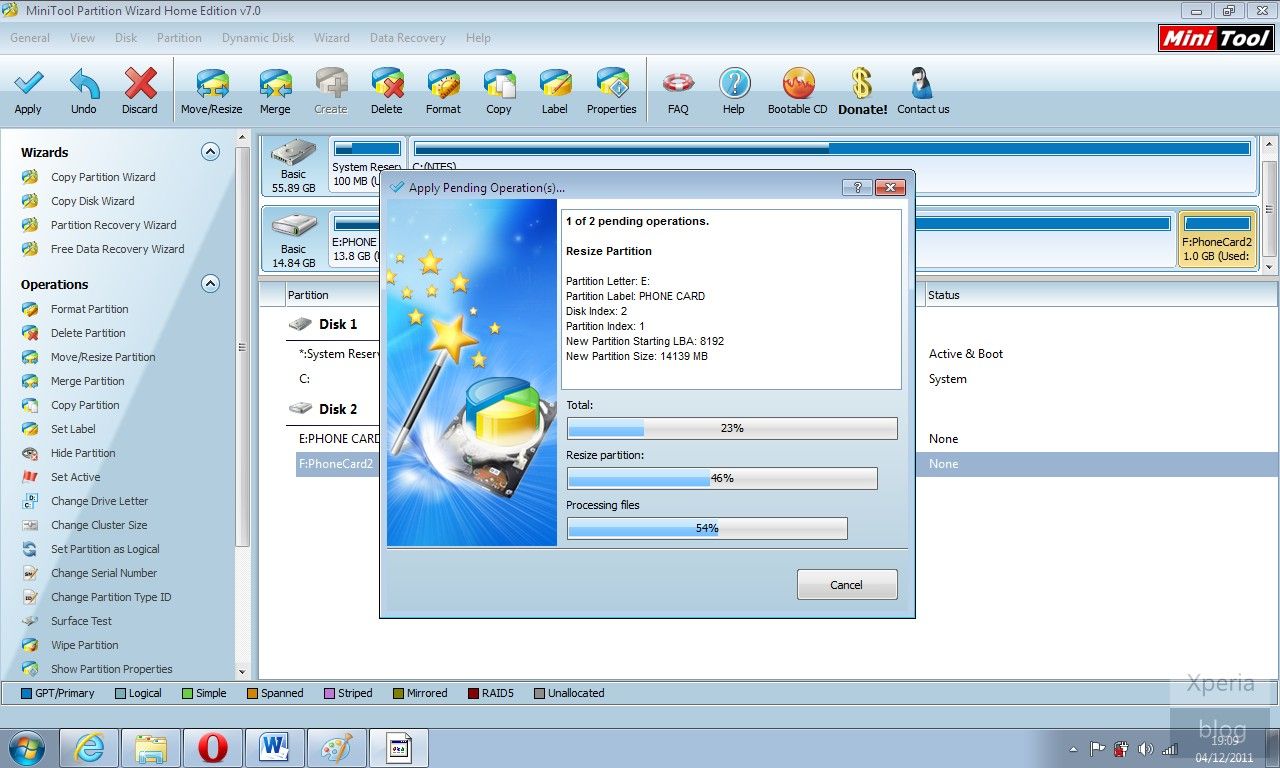
MiniTool Xperia
If successful, you should see message below. Congratulations your card is ready to use in conjunction with Link2SD. Restart your handset before moving to the next step.
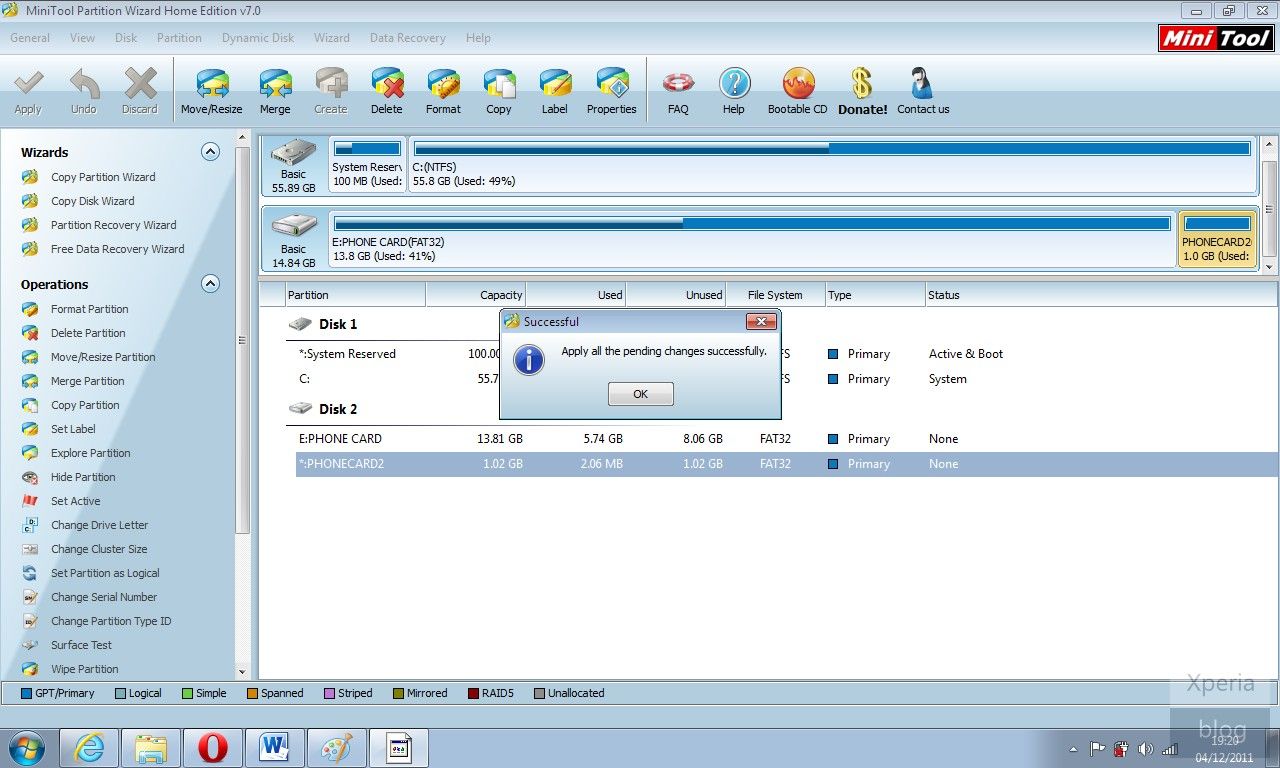
MiniTool Xperia
5. LINK2SD
This application makes it easy for users with root privileges on their phone to move applications to the SD card.
a) Open the Link2SD app on your phone. You should be greeted with the following menu, check the FAT32 option and click OK.
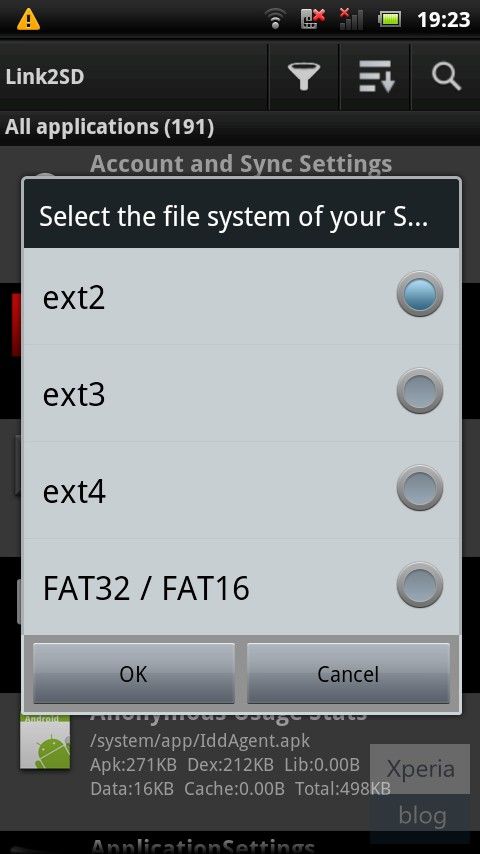
Link2SD Guide for Xperia
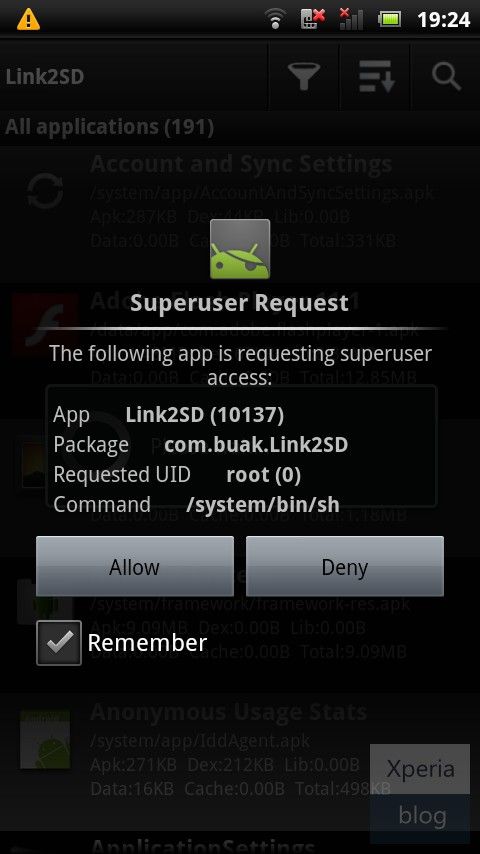
You will then see the Superuser Request, click ‘Allow’.
Link2SD Guide for Xperia
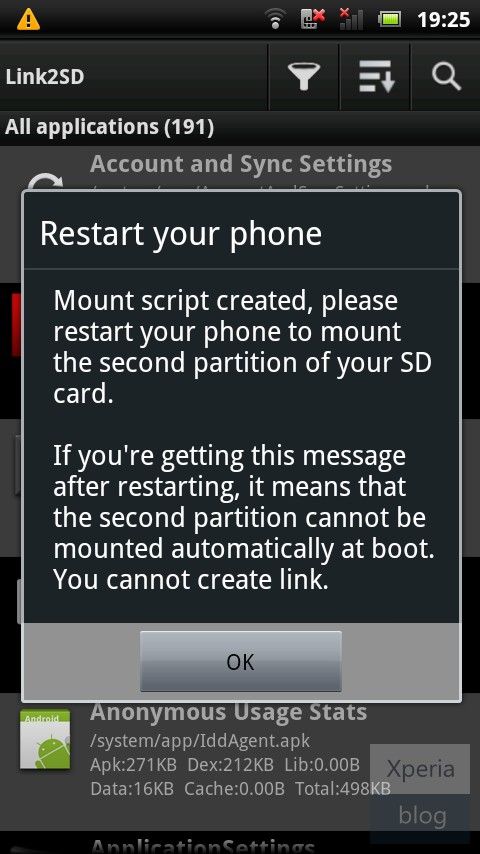
Once you see the following message, restart your phone. The app should now be ready to use.
Link2SD Guide for Xperia
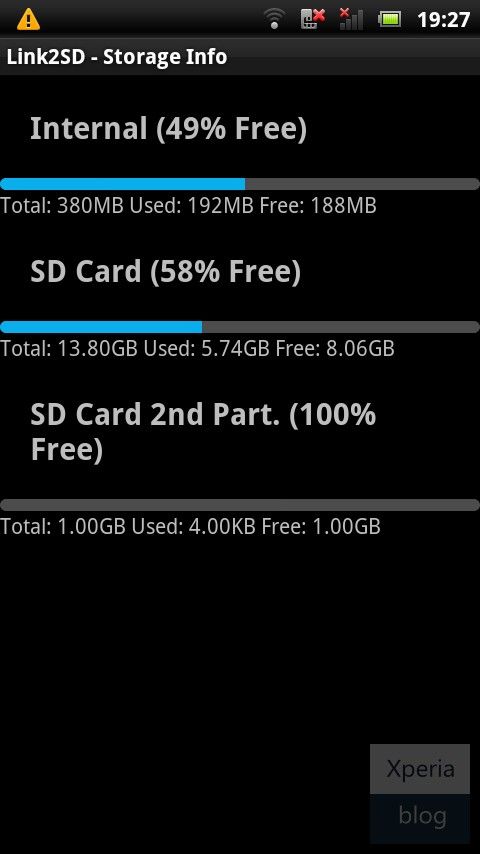
b) To make sure everything is installed correctly. Click the Menu button and go to ‘Storage Info’. This will show you the internal memory and your two partitions on the memory card. In our case, you can see that the second partition has 1GB free.
Link2SD Guide for Xperia
c) Now you need to move the apps of your choice to the memory card. Click the Menu button and press ‘Multi-select’.
Link2SD Guide for Xperia
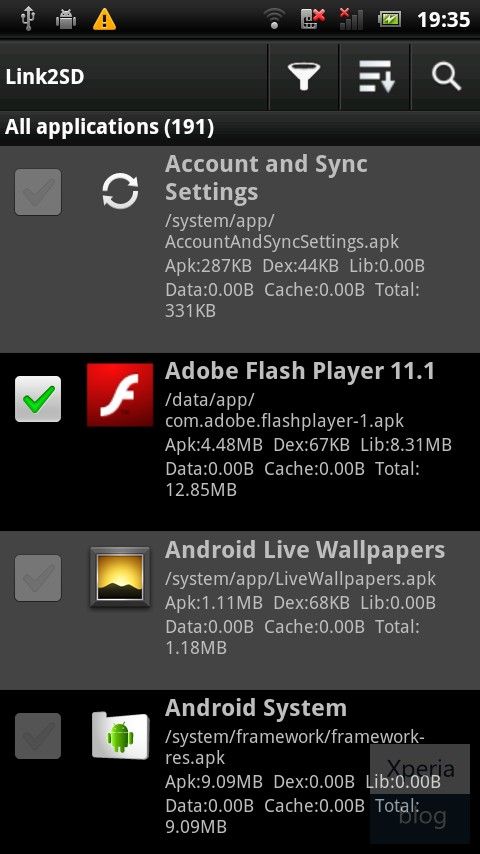
Choose which apps you want to move by clicking the tick box next to the app. System apps are greyed out and cannot be selected. Link2SD can only move apps that are already on the internal memory. If you have apps already on your SD card, you will need to move them back to the internal memory before you can link them with Link2SD.
Link2SD Guide for Xperia
If you want to move all of your apps, pressing the menu button will bring up another menu allowing you to do this.
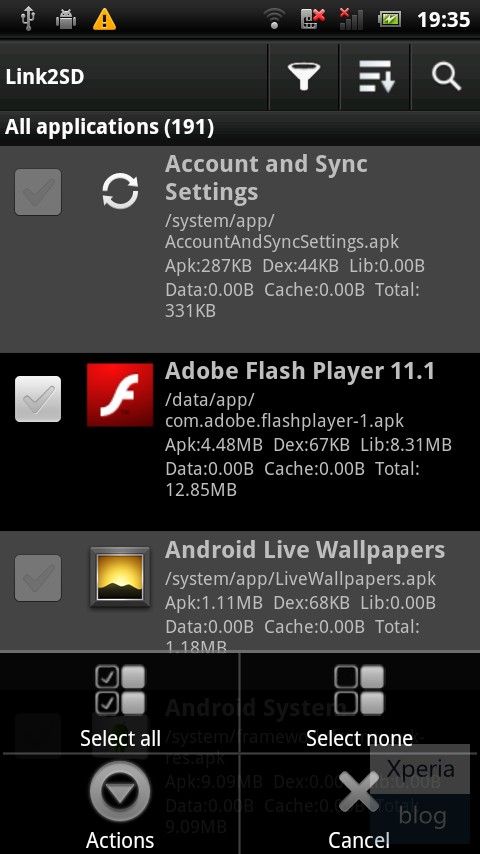
Link2SD Guide for Xperia
d) Once you have chosen which apps you want to move, you then need to hit the menu button and press ‘Actions’, which will bring up the following menu. Press ‘Create Link’.
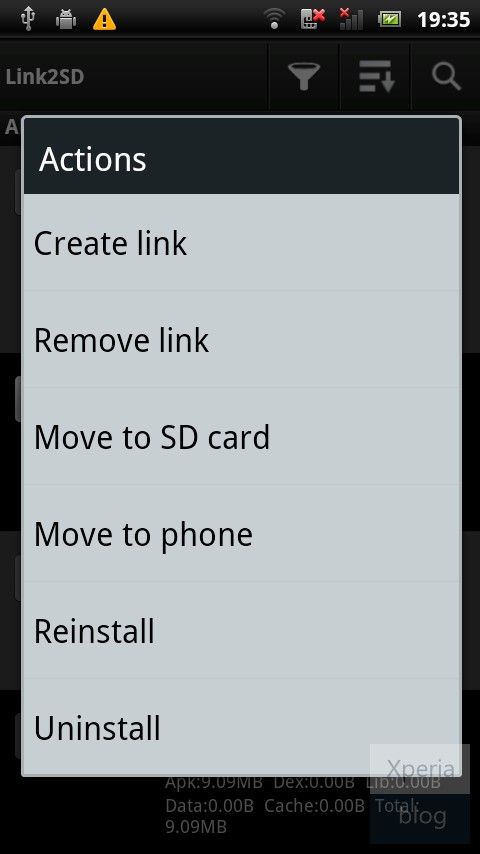
Link2SD Guide for Xperia
Leave all three check boxes ticked and press OK. Link2SD will now do its work and move/link the selected apps to your memory card.
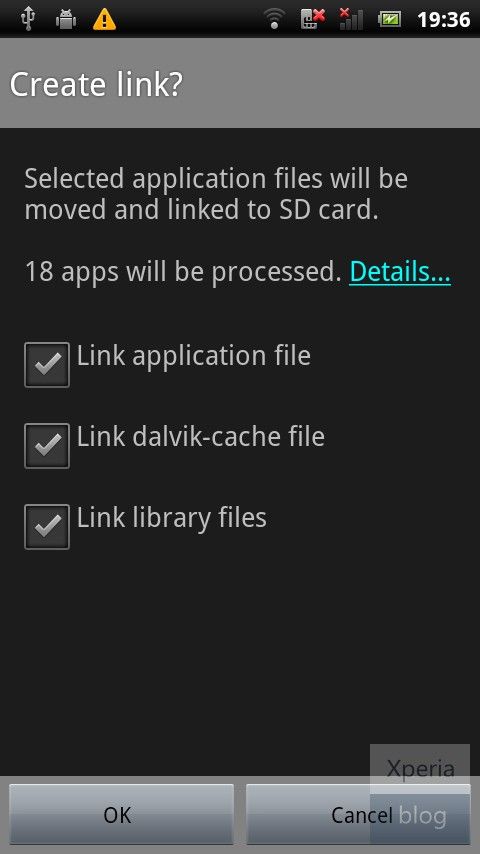
Link2SD Guide for Xperia
Once finished, you should see that the apps you have moved have ‘Linked -> SD Card’ in red font in the Link2SD app list. Reboot your phone.
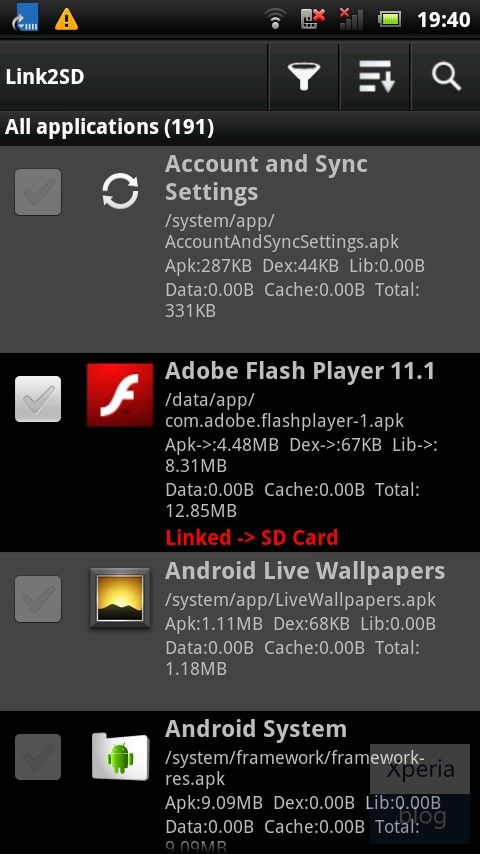
Link2SD Guide for Xperia
e) Congratulations your phone is now using Link2SD! You should now go to Settings by pressing the menu button and configure how you would like Link2SD to work. The main decision here is whether you want to Auto Link newly installed apps to the memory card. Given that you’ve gone through the hassle of installing Link2SD we suggest you enable Auto Link and make worrying about your internal memory a thing of the past.
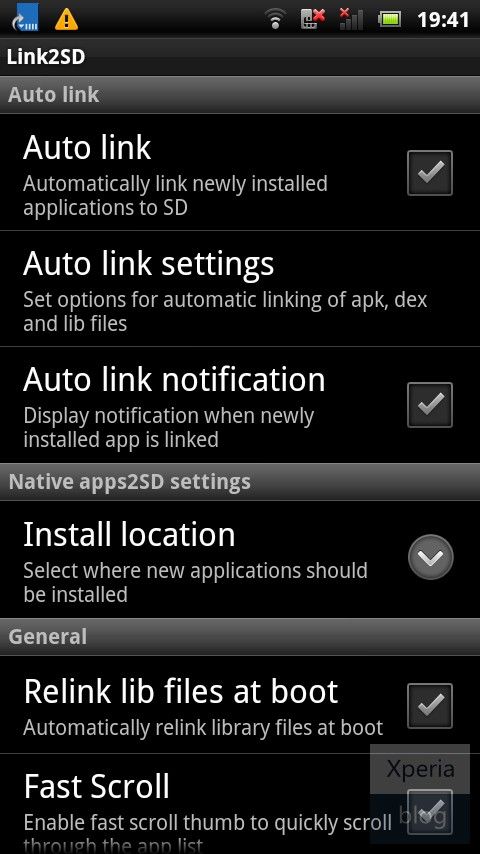
Link2SD Guide for Xperia

Use and Enjoy if link not Available Plz Comment it

Saturday 27 October 2012

How to Run Computer Faster

                How to Run Computer Faster


Make Your PC faster than Before-
1.        When the computer starts the other programs(the programs which starts when computer turns on) are also loaded to the memory, which takes more time ,to get rid from this just remove unwanted programs from the computer’s startup list. To do so just go to Start menu, go to the run and type ‘msconfig’ and the Microsoft config program will start just click on the startup tab and uncheck the unwanted programs. And restart to changes take place.
2.       Use Ready boost in windows seven to boost your pc with the help of the pen drive, which converts your pen drive to ram. If you are running some other OS like windows XP then use “e-booster pro”.

3. Increase page file of the computer. Go to My Computer>C drive>properties>advanced>virtual memory>page file. Increase the page file 20% more than the default page file.
4.       Delete all temporary files, go to run and type ‘%temp%’ and delete all temporary files.
5.  Disable search index service. Go to My Computer>C drive>properties>allow indexing service>turn off the service.
6.       Defragment your hard discs weekly or monthly.
7.    Use an Anti-Spyware and Antivirus program with latest update.

How to Low ping in Counter Strike 1.6

                             Low ping in Counter Strike 1.6


Low ping Depend Your Pc Performance and Internet Speed

But other Solution How to Low ping Stable

First Download Ping Files Below This Link

Extract Files For Winzip And Copy Ping Files and Paste Cstrike Folder

Then Play Cs 1.6

Open Console Tab and Type exec ping.cfg

then Type sv_airaccelerate 200 Then Play cs

Enjoy Counter Strike 1.6 Low Ping Stable

If link broken plz comment it

Free Download :::: Download Ping Files

internet download manager Fully Cracked

 Internet download manager 6.12 Fully Cracked


Full Version internet download manager

:::: How to set up full cracked internet download manager

:::: First download idm and patch below this link

:::: install idm setup

:::: then crack files copy and past where install your idm files            overwrite it

::::then open patch and patch your idm

::::setup completed Enjoy Full idm

If link broken plz comment it

Free download :::: Download idm and patch files

Wednesday 24 October 2012

Metal Slug For Android

                    Metal Slug For Android


“METAL SLUG 3” heads out to Android! Use various weapons and slugs!!
The legendary NEOGEO 2D action shooting masterpiece “METAL SLUG 3” heads out to Android devices! Use various weapons and slugs to fight your way through and survive on the battlefield!!
★Not only a perfect port of the original NEOGEO game!
In addition to its classic “ARCADE MODE”, this perfect conversion of “METAL SLUG 3” includes a “MISSION MODE”, allowing you to select in which stage you want to play!
You can now train yourself in your favorite stages or those which give you a hard time!
★ Command many Slug vehicles like an ace!
The Slugs are back and more colourful than ever, with Slug Mariners, Drill Slugs, and Elephant Slugs joining the original Metal Slugs and Slugnoids!!
★ Clear all routes via the branching map system!!
A branching map system allowing you to take a different route to the end with each play-through, and an immense map of endless gameplay awaits you in “METAL SLUG 3”!!
★Intense cooperative gameplay via the Bluetooth function!
"METAL SLUG 3” can be doubly enjoyed by playing with another brother-in-arms simultaneously via the Bluetooth function!
Will you be able to clear the hardest stages with your friends?
★Compatible with “OpenFeint"!
Complete the maximum number of “ACHIEVEMENTS” in order to increase your "METAL SLUG 3" Player Rank!
Beat the best scores and become World’s Number 1!!


 if link Broken Plz Comment it 
                                                                                                                                                                  Free Donwload ::::  Download Link

Chrome For Android

                     Chrome For Android


The speed and simplicity of Chrome, now on your Android phone and tablet.
Search and browse fast with Chrome on your Android phone and tablet. Sign in to sync your personalized Chrome experience from your computer to bring it with you anywhere you go.
Search fast
- Search and navigate fast, directly from the same box. Choose from results that appear as you type.
-  Browse faster with accelerated page loading, scrolling and zooming.
Simple, intuitive experience
- Open and quickly switch between an unlimited number of tabs. On your phone, flip through tabs the way you would fan a deck of cards. On your tablet, swipe from edge to edge to switch tabs.
Sign in
- Sign in to Chrome to sync your open tabs, bookmarks, and omnibox data from your computer to your phone or tablet.  Pick up right where you left off.
- Send pages from Chrome on your computer to Chrome on your phone or tablet with one click and read them on the go, even when you’re offline.
Privacy
- Browse privately in Incognito mode
 
if link Broken Plz Comment it

Download Link ::::  Free Download

Playstation For android

 
                   FPse playstation For Android
 
Playstation (PSX) Bios
Playstation Emulators, such as FPse and PSX4Droid, require you to have a Playstation BIOS to operate. You can think of Playstation BIOS as a set of instructions to jump start the Playstation Emulator. Without it, you will not be able to play the games or ROMs in our case.
What you need to do is download the Playstation BIOS, unZIP it, and then place in the same folder as the roms. Afterwards, load it into the emulator just like you would open a ROM. When completed, you will be able to select a ROM and play.


 if link broken plz Comment it 

Download link  ::::   Free download

Prince Of Persia Classic

                       Prince Of Persia Classic

Overview

You are the Prince of Persia.
You are the Prince of Persia on a daring rescue mission to save your Princess
Fulfill your destiny, play this game, and experience the thrills and adventures of this classic tale
Features
Old tale, New skin
Replay the adventure of the original Prince of Persia in a complete new skin as you battle your way through the dungeon to rescue the Princess.
Perform death defying stunts as you proceed from the dark and grim dungeons to the beautiful Palace tower.
Amazing Levels
The path to rescue is never simple Levels are filled with fiendish traps which will require unflinching resolve to be completed and with Prison guards who can only be defeated by excellent swordplay or trickery! Unveil the dark secret which will set in stone the legacy that will follow.
Multiple Game Modes


if link broken comment it
Free Download ::::: apk File
                                   Data File
How To Install
1) Install The Apk
2) Copy the sd data to sdcard/Android/obb/...here
3) Launch & Play!